Here’s another interesting tangent I came across while investigating some historical stuff. I’m interested in how technology enables new weapon designs, and the principle of “stealing” munition technology in history has occurred many times.
I came across this story of how the Japanese obtained firearms from a Portuguese vessel in 1543 and reverse engineered the weapon. The Portuguese matchlock was very modern and innovative technology as far as the Japanese were concerned, almost akin to magic.
Readers will recall from earlier posts that in the mid 15th century matchlocks were used in Europe. The Portuguese were exploring the Far East and they were using a spring assisted “snapping” matchlock. In this the trigger mechanism releases the “cock” holding the burning match and a spring causes the match to rotate onto the powder pan. Readers of James Clavell ‘s “Shogun” will know the story of Europeans arriving in Japan. In September 1543 a Chinese junk, with Portuguese adventurers aboard, made anchor after being damaged in a storm at the island of Tanegashima off the Japanese coast.
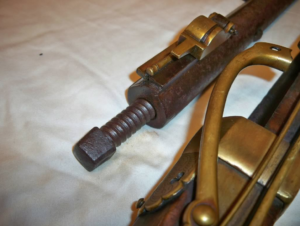
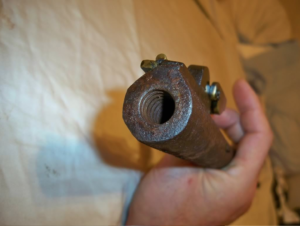
The lord of the island, Tokitaka, purchased two of the matchlocks which were sold “for a great profit” and tasked his sword maker with producing replicas – a very early example of foreign material acquisition and reverse engineering. Japanese swordsmiths were expert metallurgists, but the swordsmith had difficulty in machining the barrel so that the screw on the end could be fitted. The screw can be seen in these images, and could be removed to allow the barrel to be easily cleaned.
A year later, a Portuguese blacksmith arrived in Japan ,and he was persuaded to pass the engineering secrets. Legend suggests that the Portuguese blacksmith was offered the hand in marriage of a beautiful woman called “Wakasa”– a nice reward for switching sides and bringing key technology with you. Within 10 years, 300,000 “tanegashima” matchlocks had been produced, completely revolutionizing Japanese warfare.
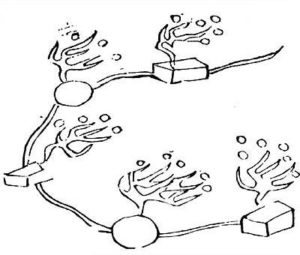
Ingenious Japanese engineers then improved the basic design adding designs to protect the firing mechanism from rain, and experimenting with larger calibres. Here’s a great contemporary image of Japanese musketeers in rain gear with boxes fitted around the firing mechanism to keep the rain off.

Interestingly, the Japanese retained use of matchlocks, even when the rest of the world moved on to flintlocks in the 1600s, and in fact retained the use of matchlocks until percussion cap rifles were introduced in the mid 1800s (about the time of the film “The Last Samurai”)
Japanese matchlocks were all individually hand-made and generally parts were not interchangeable between weapons. The Japanese weapons were not fired by holding them to the shoulder, the butt was placed next to the cheek and both arms held the weapon in front of the firer. This though was not unique to Japanese matchlocks and was also seen in many European weapons of the time. There’s a good video here – note the delay between the powder in the pan firing and the powder in the barrel firing
I’ve found a translationof how Japanese blacksmiths made the barrels of the weapons – and you can see the great metallurgical expertise of Japanese swordmakers being applied to this engineering process
1. To make a Teppo, one first makes an iron bar called a “shingane”. For a Teppo one shaku (30.3 cm) in length, the shingane would be one shaku longer, or four shaku. Straw is wrapped lightly around one of the ends of the shingane in order to make it easier to pull out during the teppo-making process.
2. Next, an iron sheet, called a “kawaragane” is prepared in the appropriate size and thickness to match the teppo. When the kawaragane is ready, it is wrapped around the shingane; the shingane is taken out when the teppo is put on the fire and put back in when the iron is being forged. After the iron has been well forged, the seam is heated until it acquires a paste-like texture and welded together. This is called “wakashizuke”. This condition, consisting of a rolled kawaragane, is called an “ara-maki”. From this stage, polishing the barrel with a file and attaching the necessary parts will result in a finished teppo. This type of teppo is called a “udon-bari” and is an inexpensive standardized product.
3. Expensive and well-made teppo are made by joining to the aramaki barrel many sheets of iron, hammered into long strips, wrapping them around the barrel and forging them by wakashi-zuke to make a stronger teppo. The result is called “kazura-maki”.
4. More “kazura” (iron strips; literally, vines) are welded to make a half-molten ara-maki. This is fully melted and welded together, using a hammer to forge the iron from the edge. This is called “tsume-maki”. Sometimes, at this point, the cartridge chamber is doubly wrapped. At this stage, the muzzle is wrapped thinly and the breech thickly in a kazura-maki, resulting in an almost complete barrel.
5. If the entire barrel, and not only the cartridge chamber, is to be doubly wrapped, the strips are wrapped in the opposite direction as the first time. The result is a doubly wrapped barrel.
6. Next, a thick iron sheet is wrapped around the thinner end (the muzzle) to make the “koji”. A rough mold of a pan is made and placed in the cartridge chamber.
7. The resulting barrel is called an “arakata-zutsu”. The arakata-zutsu is put through a hole in a “katagi” (hardwood) and fastened with wedges and the bore is polished using a steel drill. First a rough drill and then, in the final steps, a finer drill is used.
8. Next, an auger is used to cut a breech bolt hole on the breech.
9. After one is finished with the auger, a file is used to shape the upper half of the teppo into a round shape, for a round barrel and an octagonal shape for an angular barrel. The shape of the pan is adjusted and the foresight and rear sight are welded on to the teppo by wakashizuke and fastened with breech bolts. Furthermore, a platform for a rivet to be secured to the gunstock is attached to the bottom of the barrel.
10. Now the teppo is finished. The foresight and rear sights area adjusted next by placing a target on the same level as the bore, normally at a distance of 6 ken (10.9m), and crisscrossing some string in front and behind the barrel, and aiming at the dark spot on the target through the bore. The barrel is then secured; this time one aims at the dark spot on the target through both sights to adjust the sights. This is called the “deai sadame”.
11. After this step, a plank equipped with a mechanism is fitted onto a gun rest made of old hardwood and match clippers and, in the case of an outside mechanism, a spring, as well as a rain-guard, smoke-guard, and trigger are attached to complete the teppo.
I found the above here where there is also a first person description of the arrival of the technology, allegedly written in 1606. Worth a read.